Digital Foundry vs. Gameplay Capture
The HD kit we recommend for gamers on a budget.

For PC owners, recording game footage is a piece of cake. You buy FRAPS or check out a free alternative (like the intriguing MSI Afterburner) and a few mouse clicks later you're on your way. But what are the cheapest options for console enthusiasts looking to capture their gameplay on a budget?
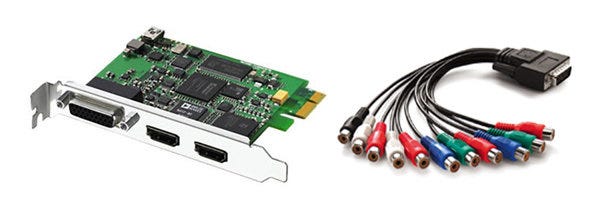
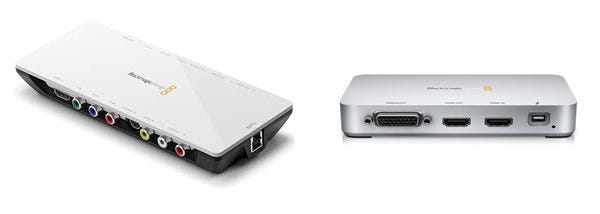
Digital Foundry's entry-level recommendation is the Blackmagic Intensity Pro, readily available for around £130-£150. There are alternatives of course, which we'll cover later, and the Blackmagic tech has a series of limitations that could put some people off, but for the average gamer simply looking to record his own gameplay, upload to YouTube or archive off for future reference, the Intensity Pro will do just fine - as long as it's configured correctly.
Taking the form of a PCI Express x1 expansion card, the Intensity Pro is compatible with PCs and desktop Macs, allowing users to record footage from analogue component or HDMI. The range of supported resolutions is limited, but for the purposes of recording game video from PS3 and 360, 720p is really all you need.
Its other major drawback is that you cannot acquire HDMI video from a PlayStation 3 or any other HD source that utilises the HDCP content protection system. This limitation is in effect for a couple of reasons. Firstly, while the utilisation of HDCP encryption on PS3 gameplay is pointless and baffling (Xbox 360 doesn't use it at all), capture card manufacturers are not keen on their equipment being used to create digitally perfect copies of content such as Blu-ray movies or TV transmissions. Secondly, Intensity Pro wasn't really designed for games consoles. It's primarily made for use with HD cameras, none of which have HDCP encryption active at all.
Component vs. HDMI
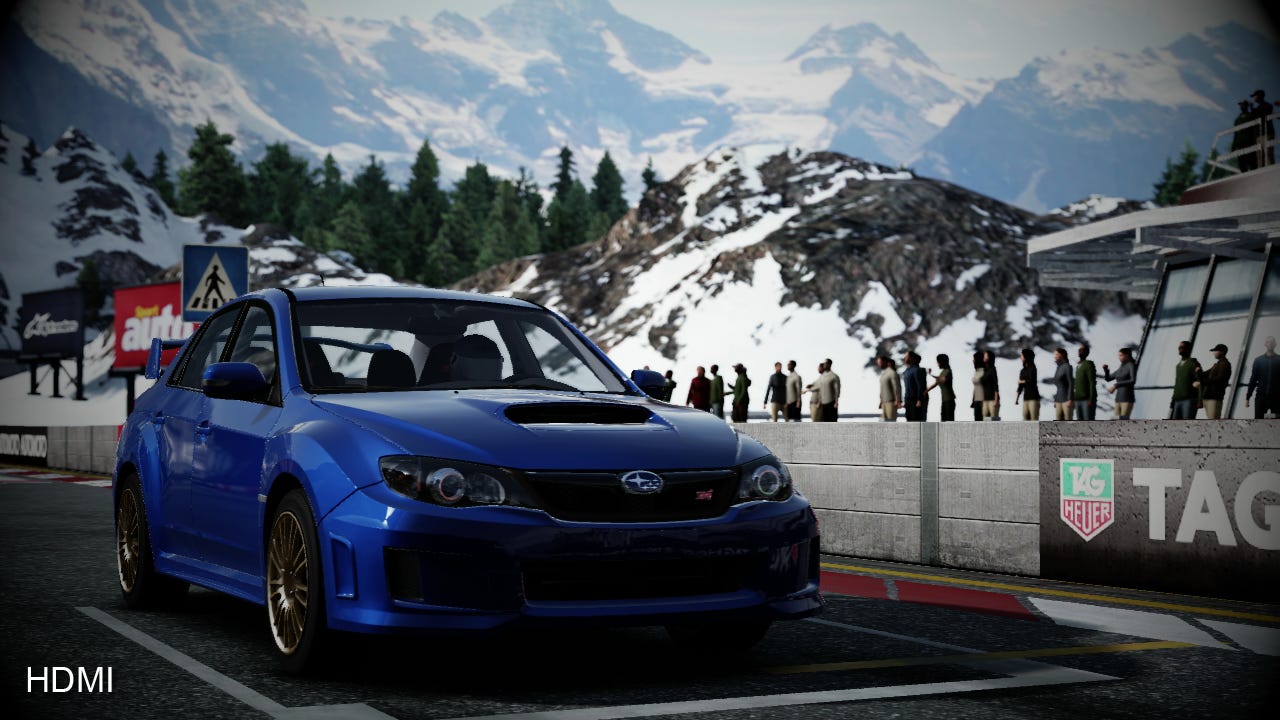
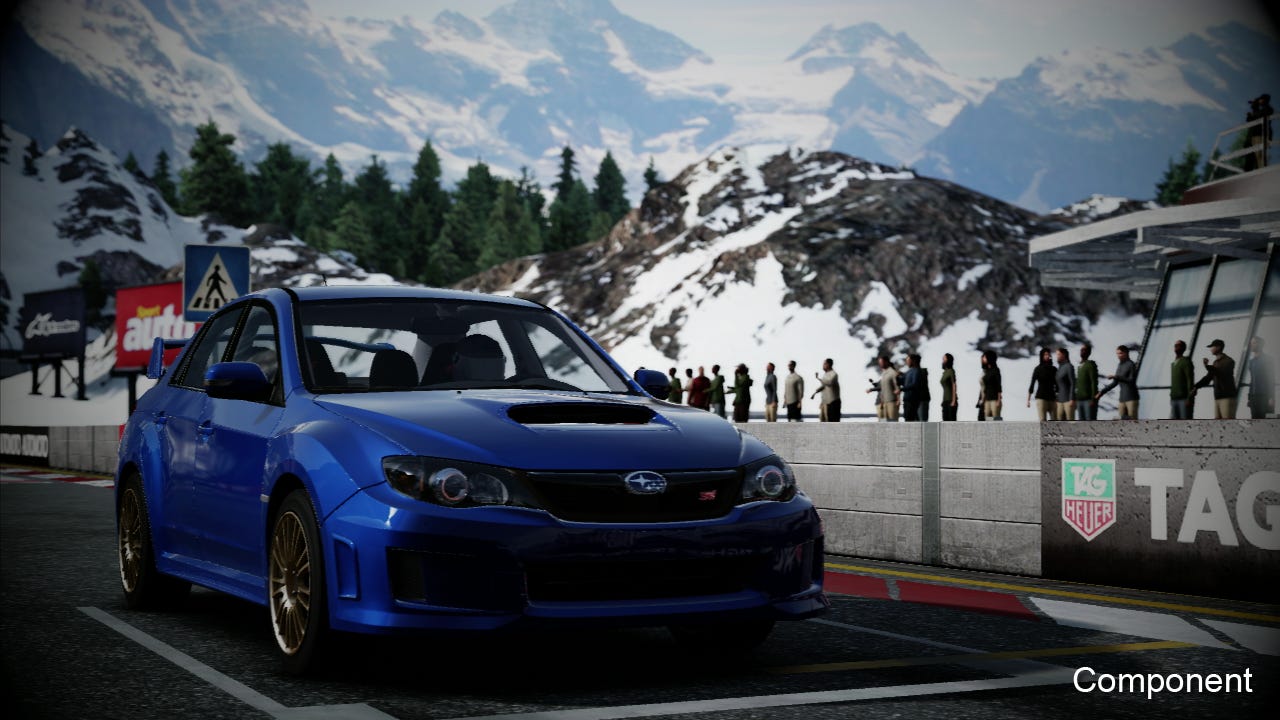
The solution here is obvious: capture Xbox 360 from HDMI and use good old analogue component for PlayStation 3. Yes, there is a quality difference between HDMI and analogue component and personally we wouldn't use it for our Face-Off coverage, but the differences are not extreme and if your aim isn't reference quality but simply to create good-looking video, component is certainly good enough. To illustrate the quality difference such as it is, in the shots below we've used the Intensity Pro to capture the same image using both component and HDMI connections.
The component signal's colour balance is a little off and if you look really closely you may notice that the definition is not quite so pin-sharp, but the fact is that overall quality of both signals isn't a million miles apart: you're feeding the card 720p and that's what it's giving you in your captured video.
So does utilising HDMI give a true 100 per cent digitally lossless image? When running from an HD camcorder, it can. In fact, the Intensity was originally designed so film-makers could record direct from the camera, bypassing the lossy compression systems like AVC-HD used to store footage on memory cards or hard disk. Indeed, the first release of the Intensity didn't work with games consoles at all, the functionality only being added in a later firmware update.
Why? The explanation is simple: cameras use a different digital signal format compared to the 24-bit RGB output of the consoles. It's a lower-quality colour-space, and the solution Intensity uses (in common with all entry-level HD capture cards) involves downscaling RGB to this so-called YPrPb 4:2:2 or YUY2 format, downsampling the chroma resolution, meaning that bright primary colours like red and blue can display noticeable artifacting.
A 30 per cent downsample in chroma resolution may sound rather harsh but the fact is that if your end-game is to encode your video to WMV, h.264 or encode to YouTube, the downgrade is insignificant compared to what happens next as the footage is compressed into its final form - indeed, chroma is downsampled again to an even less precise format. HDMI is still the best input to use overall on this card - it's just important to bear in mind that digital capture doesn't necessarily mean a completely lossless transfer - and the high-end purists looking to preserve video output in its entirety probably won't be looking at sub-£200 capture cards anyway and will be pursuing a solution capable of native 24-bit RGB support.
Getting the Most Out of Budget Hardware
So with the bad news out of the way, let's concentrate on the good. First up, the Intensity has excellent video passthrough capabilities. This means you can monitor your gameplay on your PC screen but also attach an HDTV to the card and continue gaming as normal. The passthrough is flexible enough that you can capture from the component input but have your main gameplay display attached by HDMI - or vice versa. Very useful.
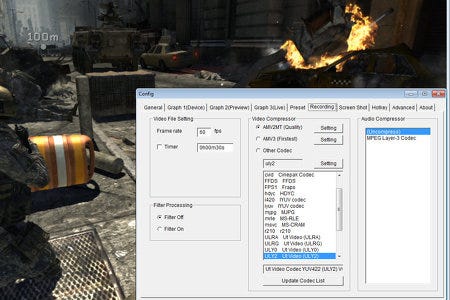
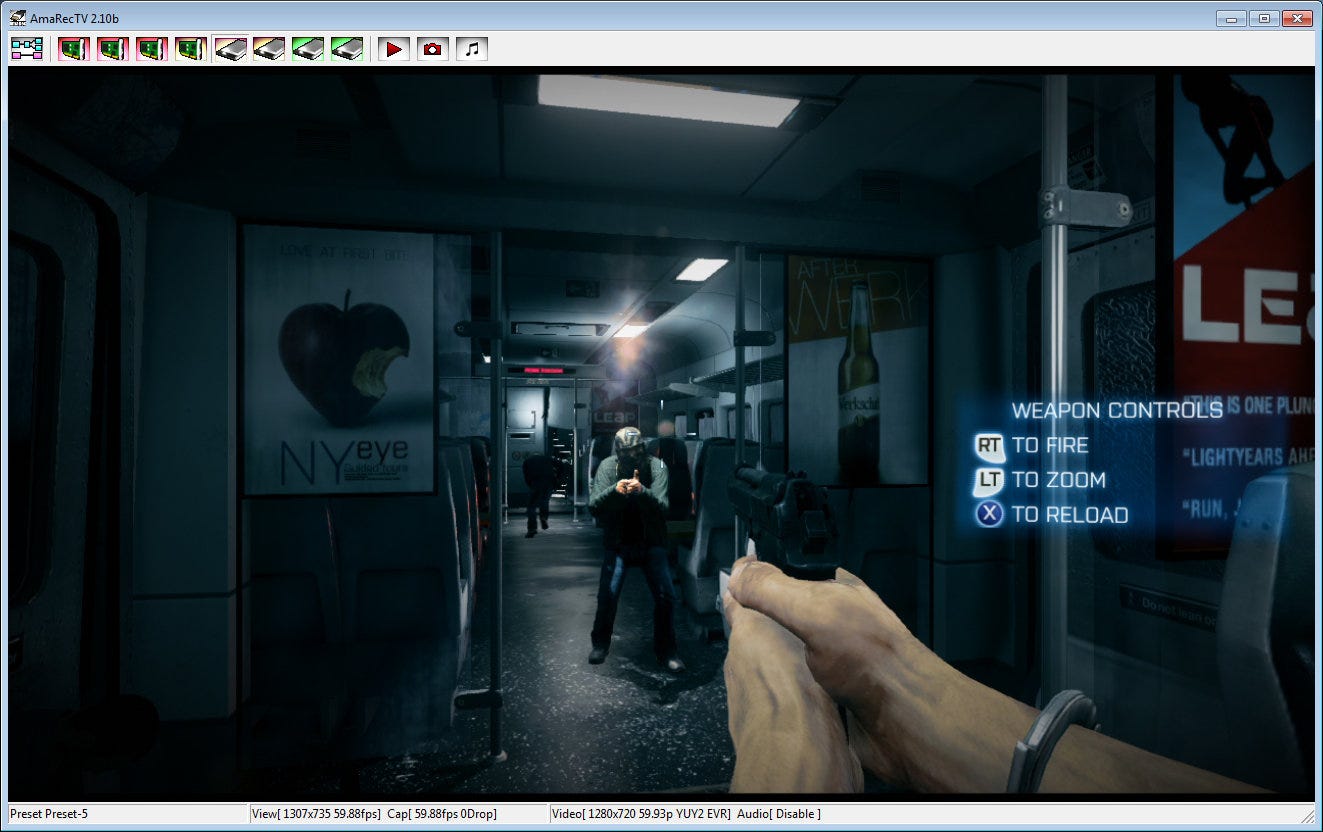
Intensity is also supplied with DirectShow drivers, meaning that it usually interfaces fairly easily with any type of PC capture or live-streaming program. For recording gameplay, we would recommend AmaRecTV for the job, because the supplied Media Express tools you get out of the box are limited.
The main challenge in capturing HD footage is the sheer size of the files you'll be acquiring. Uncompressed HD video from Intensity offers a good quality level, but 720p60 weighs in at around 110MB/s or thereabouts - that's beyond the sustained writing capabilities of most hard drives which slow down as you fill them. Blackmagic's only alternative is to compress with MJPEG, literally a motion version of the compression tech used for shrinking down pictures. This introduces a lot of compression artifacts and kills fine detail, so while it'll allow you to capture onto "normal" hard drives with ease and is functional enough, too much quality is lost for our liking and footage looks oddly washed out too.
The basic rule of thumb with video destined for YouTube or other streaming media is that the cleaner the source you supply, the better the quality of the final presentation. Giving their encoders video that has already been compromised by macroblocking and other artifacts is not a particularly good idea - it'll just make them even worse in the final presentation.
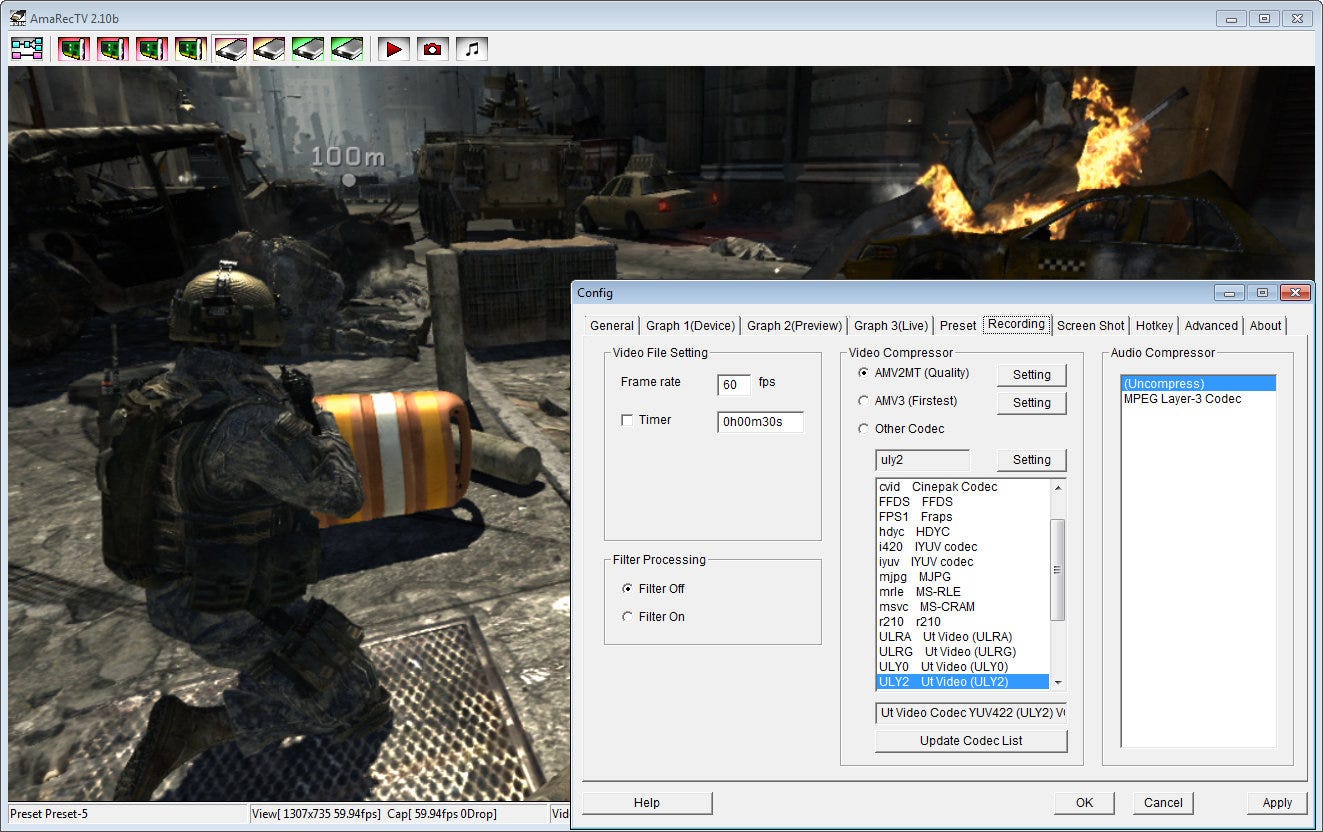
By opting for a third-party solution like AmaRecTV you can bin the lacklustre MJPEG codec and instead opt for lossless and less aggressive lossy compressors: top candidates here are the freeware UT Codec Suite and the $10 AMV Codec, which offers both lossless and great quality lossy compression. File sizes remain large, but at the very least a standard hard drive can cope with the throughput without dropping frames during capture.
The other plus point of these alternative codecs is that they are better optimised for multi-core systems and are relatively light on CPU resources compared to MJPEG. Just about any dual-core CPU should be able to cope with 720p60 compression.
Another advantage AmaRecTV offers is that you can record at 30FPS even from a 720p60 source. Bearing in mind that YouTube and most video streaming services only support 30FPS anyway, and indeed that most games operate at 30FPS, this is a useful way to save space and make captured files easier to work with.
Both the supplied Media Express software and AmaRecTV produce AVI files that you can then edit in your package of choice. We'd recommend exporting your final edits using one of the lossless codecs we've recommended to maintain the quality level of the original capture all the way through to your final video. If you're transmitting to YouTube at this point, we'd recommend encoding into h.264 using a program such as Handbrake or StaxRip. Use a "RF" or "CRF" profile (18-20 for the quality level should provide an excellent picture). These profiles allocate bandwidth according to the complexity of the image, so macroblocking will be minimal - the encoder ensures that each frame is compressed to the same quality level.
Intensity Variants and Alternatives
While we recommend the Intensity Pro PCI Express upgrade, other versions of the same technology are available. The Intensity Extreme appears to be exactly the same product in an external enclosure using a Thunderbolt interface for Mac. More intriguing is the USB 3.0 Intensity Shuttle, which appears to offer more features - such as support for 480p, which is potentially of use to gamers for Wii and legacy console capture. 1080p60 recording - the preserve of high-end cards - was also initially mooted in advertising, but never worked and is now excised from Blackmagic's promo materials.
The issue we have with USB 3.0 is that bandwidth spec is equivalent to 4x PCI Express, but many USB 3.0 implementations only support one lane's worth of throughput, resulting in the Shuttle not working on many USB 3.0 setups. This isn't the fault of the product but of the implementation of what should be a "standard" interface. We've also seen some cases of the PC DirectShow interface not working properly with the Shuttle, meaning you may be stuck with the Media Express software that comes with the unit - a tool we can't in all honesty recommend.
Other enthusiasts aren't so keen on the Intensity and instead favour the Avermedia AverTV HD DVR upgrade card (specifically, the C027 model). In combination with a specific driver revision, HDCP-encrypted video can be captured by using a tool like AmaRecTV, while running the supplied "media centre" software (which is awful by the way) in the background. Bizarrely, this results in decrypted video which DirectShow can then access. The Avermedia card also supports 480p component capture which had no problem getting to work, in theory making it a superior choice to the Intensity Pro for gamers looking for an all-encompassing solution.
We found it to be an adequate performer and the HDCP bypass trick with the specified driver revision certainly works for recording PS3 gameplay. However, the chipset this card uses has a bug that sees HDMI colour balance compromised to a certain extent, and there is no video passthrough, though AmaRecTV's excellent real-time preview window compensates this to some degree with just a 50ms latency. The real problem is one of availability, as the card no longer seems to be widely available in the UK.
Live-Stream Your Gameplay
Both Avermedia and Blackmagic's DirectShow interfaces are also helpful for a growing offshoot of capture capabilities: live-streaming. As far as your PC is concerned, a capture card is just another camera source, meaning that you can use the technology to beam your direct feed gameplay across the world. The key issue here is the state of your upstream connection, and the quality of the link to the server you choose to stream from.
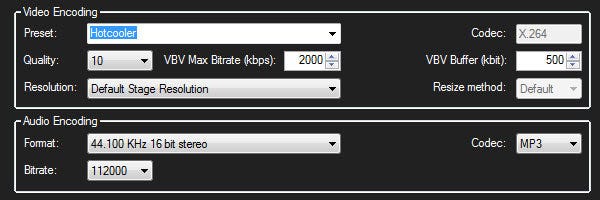
The typical ADSL connection only supports around 800kbps to 1mbps of bandwidth, which we wouldn't recommend for trying to stream live gameplay at 720p. On the other side of the equation, those with meatier upload capabilities will probably be stymied by bandwidth throttling server-side. During our experiments, we typically found it hard to stream above 2mbps, even with a 100mbps fibre-optic connection. XSplit is the software of choice for live-streaming, with Twitch.TV and the remarkably named Own3d.TV proving to be very popular for game-streaming. While the default settings will go some way to getting up and running, for those with powerful connections, here are our preferred settings. Adjusting resolution to 480p and maxing out bandwidth to 1mbps would be preferable for ADSL - XSplit can resize the video for you so you can leave the capture hardware running at 720p.
The settings below, in concert with this preset (put this into XSplit's ffpresets folder) should be good for 720p30 live encoding, and even utilises the periodic intra refresh technologies used by Gaikai and OnLive for improved picture quality on restricted bandwidth.
In the past, HD capture was an expensive proposition - and for high-end applications along the lines that Digital Foundry itself specialises in, it still is - but the emergence of cards like the Intensity Pro has made high-def recording much more of a commodity. Prices have been driven down, with enthusiasts ready to fill the gap left by lacklustre "in the box" tools with cut-price or even free alternatives that in many cases provide superior quality. For gamers looking to share content - be it via screenshots or videos - there's never been a better time to get capturing.