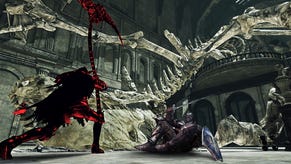
Dark Souls 2 - Heide's Tower of Flame, bonfire, Pharros Lockstone, lever, Divine Blessing
We'll show you how to access Heide's Tower of Flame, find a hidden Estus Flask Shard, and arrive ready for battle with the Dragonrider boss.
The fights you'll find inside the Tower of Flame are considerably tougher than those you'll have faced up until now. Fortunately, there are a few handy items you can collect on the way to the tower, and we'll make sure you grab each one as you make your way to the next area of Dark Souls 2.
How to find Heide's Tower of Flame
Make your way back to the hub of Majula and open that locked door to the hut that's near the Blacksmith. Once you're inside you should see a chest that you can loot to get hold of a Short Bow. After you've grabbed it, pop back outside and speak to the Blacksmith. Now go to the decrepit house all the way over to the right and use the key you picked up earlier to open the door.
Go inside, then walk down the hallway until you're in another room. You'll find a Pharros' Lockstone by the pile of books in the corner of the room. Grab it, then make your way down the corridor that's to the left of the entrance to this building. Keep following the path as it veers to the left, then go up the stairs when you reach the end.
There's a room to your left which contains a chest. Go inside and open it up to get hold of a trio of Titanite Shards, and three more torches too. Go back downstairs and then head left when you reach the bottom. Keep going down the next set of stairs you come to, but be ready to fight a skeleton when you reach the next level down.
Up ahead of you is a very useful Estus Flask Shard. Make sure you pick it up, then go through the doorway to your left. Have a rummage around inside the coffer you find to get a Soul Vessel. Now exit the building completely and make your way into the chapel-like building that's over on your left.
How to open the door to Heide's Tower
Once you're inside, make your way downstairs and keep walking through the hallway to your right, then head down the second set of stairs. You'll find a lever at the bottom which opens a door when you pull it. Go through that door, and then take the stairs on your right. Once you've reached the top, you'll find yourself standing at the start of Heide's Tower of Flame.
Be ready for a fight the moment you step into the Heide's Tower area, and it's a fight that's considerably tougher than the rather timid enemies that populated the Forest of Fallen Giants. Even though the combat's tougher, just keep in mind that some of the monsters you demolish won't reappear - even after you've died or rested at a bonfire.
Heide's Tower of Flame guide
Make your way along the path and get stuck into the first enemy. Keep as close to this enemy as you can, and dodge out of the way of its opening vertical attack. Get over to the right of the creature, then slip in behind it to avoid the next, horizontally-swinging attack.
"If your positioning is a little off - and it looks as though the enemy's about to launch a horizontal attack - dodge out of the way immediately."
The third attack in the pattern is another horizontal swing, but it comes at you from the opposite direction this time. Maintain your position to the enemy's rear, but move over to the opposite side to survive the final part of the attack pattern.
You're now free to retaliate with your own damage, but keep an eye out for when the enemy gets ready to begin its combat pattern again. That pattern remains exactly the same as before, so just exercise a little patience, take your own swings whenever it's safe to do so, and the creature will eventually fall to the ground. That's one down.
Make your way down the path to the side of the platform and ignite the bonfire when you reach it. Now go up the stairs and be ready to fight the second, considerably trickier monster. This enemy fights very much like the first one, but its attacks are a little different. It'll either attempt two horizontal swings, followed by a vertical slice, or it'll come at you with a single or twin vertical assault.
The best way to handle this fight is to once again stay as close as you can to your opponent, but this time maintain a position in front of it. If you can manage to dance with it in such a way that you never veer to the enemy's left or right, you should force the monster to stick to using vertical attacks. As soon as they arrive, dart to one side, and then align yourself in the correct position immediately afterwards.
If you've managed to force it into an initial vertical swipe, your opponent will next turn just a little to begin the next attack. While it's turning, throw a couple of good whacks your opponent's way before getting safely back into position, and allowing it to begin its own offence once again.
If your positioning is a little off - and it looks as though the enemy's about to launch a horizontal attack - dodge out of the way immediately, wait for the second and third parts of the attack pattern to play out, and then go in for another attempt at controlling the creature's combat.
Prepare for the Dragonrider fight
It's fiddly stuff, but when you've beaten the enemy you can carry on down the walkway to get your hands on both a Human Effigy and a Soul of a Nameless Soldier. Now make your way up the stairs and grab the item on the right-hand side of the door to get one more Lloyd's Talisman. There's a third enemy here which you're welcome to attack, but it's really not necessary - if you ignore him, he'll ignore you right back.
Carry on down the path and make your way into the circular section that's just ahead of you. There's a handful of enemies mooching around here, but you can once again take the pacifist approach and simply ignore them if you prefer to sneak your way around the region.
"The enemy in the middle will start attacking you as soon as you enter the area, but the other two enemies stay put if you simply ignore them."
There's a doorway over to your right that you need to go through, but if you take the left-hand door first, you'll find a pair of enemies guarding a path to the left that grants a Divine Blessing. The enemy in the middle will start attacking you as soon as you enter the area, but the other two enemies stay put if you simply ignore them.
Head through the door on the right and then keep following the path until you get to a new area. Look to your right and you'll see a section tucked away that contains a Rubbish-bearing chest. Over on the opposite side is a creature guarding the mist. You can fight this enemy if you want to, but if you'd rather get stuck straight into the next boss fight, simply lure the guard away from the mist, then dart through as soon as you've got a clear path to it.
One thing to consider before you do, however: dodging all these guys is well and good, but if you have the patience to take them all out then you can activate switches located around the Heide's Tower of Flame area which will raise platforms in the boss fight to give you more space to work in.
For more entries in our complete Dark Souls 2 walkthrough, take a look through the first page of this article.


