Dark Souls 3 - Grand Archives and the Princes of Lothric
How to kill the Princes of Lothric, along with a step-by-step walkthrough for making it through the Grand Archives section of Dark Souls 3.
We're on the home stretch now, and ready to take on the penultimate boss in the game.
From the Dragonslayer Armour bonfire, head through the arch and up the steps. Light the bonfire and grab the key and daggers from the nearby corpse.
Open the door ahead and move into the library. The Crystal Sage will appear in the arch ahead, so dodge any incoming projectiles and get in a few hits to make him vanish. Turn left after passing through the arch and ascend the stairs, making sure to grab the gem bug at the top.
Turn around and drop down a few feet to the area below and follow the shelves around to a large room with a wax-smeared floor. The enemies here are slow-moving, so should be relatively easy to outflank and defeat, but don't get caught in their wax spray as it'll reduce your movement to a crawl.
Explore the maze of shelves to pick up some items, then return to the pool of wax, dip your head in it, and go through the arch to the right. There are two gem bugs in the next room, but be careful of the bookshelves: stray too close and ghostly arms will reach out and attempt to curse you, and while the wax coating will protect you, it will wear off after a while.
Climb the stone steps, turn right, and pass through into the upper library level. Kick down the ladder to create a shortcut, and watch out for the Crystal Sage again as he'll start shooting from above - follow the balcony, turn hard left up the stairs, and then right at the landing to get in another few hits to make him move on.
Head out to the balcony and climb down the stairs to the left to find a corpse. The windows will shatter and let you back into the library, and there's another wax pool up the short stairs to the left if you need a top-up.
Head back up to where the Sage last put in an appearance and continue to follow the path. Drop down the ladder and head left behind the shelves to confront the Sage once more, but be careful as this time he only moves a few feet.
Pull the lever to the right of the wooden bridge to move the nearby shelves and open a shortcut, then cross to the other side and ascend the stairs. Get on the elevator and then open the door at the bottom to open another shortcut, and then double back and up the next set of steps to the landing where you'll find a few more wax-flingers.
Cross to the other side and continue the upward climb, grab the gem bug, and head outside. Turn left and drop down the short ladder onto the rooftop, and move forward following the roof as it curves to the left until it returns to solid ground.
Round the next corner you'll confront a close relation of the stone beast from Profaned Capital. He's a bit more aggressive but the same tactics apply - just be careful not to roll off the edge.
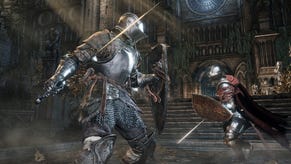
When it's safe, jump onto the balcony just below where he was sat and head back into the interior of the library. There's a knight standing guard with his back to you, so you can either take the opportunity to get in a backstab to even the odds, or simply leave him in peace. If you decide to fight, he's got an electrified sword that he may also apply a frost buff to so he can pose a significant threat.
Follow the narrow balcony to the right and prepare for a few imp ambushes on the way. Ignore the arch on the right for now and head along a little further to kick down a ladder and open another shortcut before doubling back and heading outside into a large courtyard.
Make your way towards the wide stairs until the three enemies ahead spot you, then retreat back to the balcony - they'll all follow, but the guy with the axe is a lot faster and more aggressive, so you should be able to lure him round the corner to provide some cover from the mage while you take him out. Head through the door and head down the elevator to open a shortcut that leads directly to the bonfire, then head back upstairs.
Detour for a Divine Blessing
This next section will earn you a hard-to-find Divine Blessing, but it's quite a detour so you may prefer to skip it.
Take the small set of steps to the left onto the small domed roof. Move across onto the larger dome and make your way up until you encounter three shinily dressed, very large flying enemies. They can move quickly but have a terrible turning circle, so try and run them round the roof a bit to separate them before flanking them and going for the backstab.
Climb to the very top to find a corpse, and then head into the small round building where the big guys were and carefully drop through the hole in the floor. Drop down again to the top of the bird cage, drop inside, and then drop down again onto the narrow beams.
Carefully make your way around to pillage the two corpses, but keep an eye out for the projectiles being shot at you from below. Once you've collected the items, drop down one more level and head for the balcony.
Drop down and open the chests, then knock down the ladder to climb back down again. From here it's much quicker (and safer) to use a homeward bone rather than retreading the same ground, and you're likely to have levelling to do by now anyway.
Head towards the large building at the far end of the long bridge - it's a marathon gauntlet of skeletons of all varieties, from lowly swordsmen to relentless armoured tanks, so take it slowly and don't be afraid to retreat.
When you reach the top, jump in the elevator to the right to open a shortcut to an earlier shortcut to Lothric Castle. (If you have enough stamina, you can make a run for it all the way across - you'll pick up a huge following along the way, but once you're in the elevator they'll lose interest.) Rest at the bonfire before returning.
When you emerge from the top of the elevator, wait a few moments for the patrol to move away, and then open the doors and head inside to trigger a cutscene before starting the penultimate battle.
How to kill the Princes of Lothric
Agility is key here, and as shields will be largely useless, unequip yours and two-hand your weapon instead.
The fight starts with just the elder brother, Lorian. He spends most of the time on his knees, and his sword attacks are fairly easy to roll through as he has a habit of overestimating distances and aiming slightly behind you to start with.
Dodge his attack, and during his brief recovery period get in behind him and attack, but be careful as occasionally he'll follow his attacks with a vertical slash that's hard to predict. If he stands up he'll be winding up for an overhead swing, but it takes him a while so you can get a few hits in before and after the move.
Once you get him down to 50% health, he'll start occasionally teleporting to a new location around the room and immediately following it with a ranged or lunge attack, so try and locate him as quickly as possible. He has a slightly longer recovery period after his ranged attack and never follows it with the vertical slash, so if you happened to be positioned nicely make use of the extra time to get in another hit or two.
Once Lorian is down Lothric will enter the fray and heal him before hitching a ride on his back. Lorian's moves will remain the same, but you now also need to deal with Lothric's magic projectiles - he doesn't fire them very often, but they consist of a cloud of homing missiles that can be rolled through, or a magic spear that immediately follows Lorian's ranged attack.
Your ultimate goal here is to kill Lothric, so try and get behind the pair of them to deal damage to both. When you knock Lorian down, Lothric will be completely vulnerable for between 2 and 3 seconds while he casts a healing spell, but don't risk going for "just one more hit" - when he's cast the spell, it not only heals Lorian but also has an AOE blast.
It should only take two or three cycles of knocking Lorian down before Lothric is dead and unable to revive him, and once they're both out, the fight is over.
Activate the bonfire and head for Firelink - the end is now firmly in sight.
- The next part of our walkthrough explains how to survive Dark Souls 3's Kiln of the First Flame and Soul of Cinder.
- Alternatively you can return to the index page for more entries in our Dark Souls 3 guide.


