Lords of the Fallen - Lost Brothers, Fire Brother, Lightning Brother, Planetarium Chest Key
Struggling to kill the Lost Brothers in Lords of the Fallen? Use our simple strategy to kill both these bosses, and bag the best reward too.
Once the Annihilator's dead, use the portal over on the opposite side of the fight area. When you're in the next zone, go down the path until you come to a new region. When you get there, you'll see apparitions of all the bosses you've beaten so far, along with a few leaderboard-like stats. As you work through these fights, pieces of armour will be granted to you, and you'll be glad you grabbed the lot. Eventually you'll be able to talk to Kaslo who'll whisk you off back home.
When there, have a rummage around in the chest behind you to get a Poison Resistance Shard and a Spell Point Shard. Prepare for combat, then go through the nearby gate. Next, take a left to start a cut-scene which throws you into battle against the Lost Brothers.
Lost Brothers fight
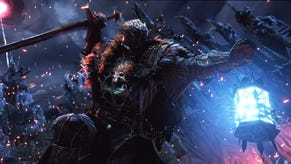
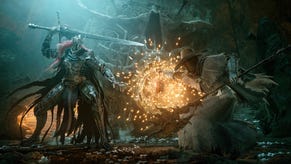
These two enemies take it in turns to attack you. While one's trying to kill you, the other's hanging down from the ceiling - keep a close eye on this passive opponent at all times, as when he drops to the ground he'll do a wide burst of area-of-effect damage.
As you might expect, the Fire Brother focuses on fire damage, while the Lightning Brother dishes out electrical pain. The Effect armour set that you picked up earlier on in this section will grant you solid defence against these two damage types, but you should also think about crafting any spare fire runes you have onto this armour. Try and make use of a shield capable of absorbing 100 per cent of fire damage too.
When you first attack the Fire Brother, he'll dish out a rapid strike that doesn't do too much damage each time, but can quickly wear you down. You also need to watch out for the pair of fire-breathing attacks he makes use of. The first will leave a burning mess on the ground, so just roll to the boss's rear to avoid it. The other attack is a more typical fire-breath which you can mitigate with your fire-proof shield. Make sure you use the time between each attack type to dish out some damage of your own.
From far away, the Fire Brother can opt to lunge towards you, then deliver a massive blast that reaches out to a pretty wide radius around the boss - a bit like the one he uses when he's ceiling-bound. If you're wearing heavy armour you'll have to hope it's strong enough to keep you alive - or pack a meaty shield - but if you have lighter armour on you should be able to get away from the worst of the damage.
As for the Lightning Brother, he favours a double-hit whack when fighting up-close. The first strike's pretty weak, but the stun will leave you vulnerable to the much harder hitting follow-up pummel. You can block the first assault without draining your energy too much, but the second will take a massive chunk off.
When fighting within melee range, it's better to try and move just out of the boss's range to trigger the double-hit combo. When the first hit arrives, move to the left of the boss - from your perspective - and get ready to deal some damage just after the second hit lands on the opposite side. This is easier to achieve when you're wearing lighter armour, but the strategy still works when you're wearing the heaviest equipment.
If you have a pretty high Faith stat, you can even use your Gauntlet to fight the Lightning Brother from range. This is also helps you avoid the creature's annoying stomp attack that's periodically used throughout melee combat. From a distance, you simply have to worry about a lightning projectile that's pretty easy to dodge.
To shake things up a little bit, each brother has a separate health bar, and when one Brother dies the other gets the attacking power of his fallen family member. The order in which you kill each Brother also affects the reward you receive from this fight. If the Lightning Brother dies first, the shield reward favours the lightning stat. You'll get more fire stats for killing the other Brother first. On balance, we recommend getting a shield with lightning on it, as these sorts of equipment are much harder to come by.
Preparing to face the last hurdle
When you've gathered up your reward, make use of the forge nearby. This will also start a conversation with the Crafter. If you want to save your progress, or just boost up your health potions, go up the stairs that take you to the Catacombs. Go down the stairs you come to and you'll find the checkpoint you need.
Once saved, go back to the Lost Brothers arena and then take the stairs just in the centre of the wall to the left. Kill the two guards waiting for you at the top, then grab the audio clip that's all the way over on your far left.
Next, go upstairs and kill the Archer, before making your way along the corridor and heading right when you come to the next room. Kill the guard who ambushes - taking care not to get thumped by his mighty greatsword - kill the Archer over on your left in the next room, then go right to start a fight with another soldier. Finally, kill the Archer lurking at the end of this section.
Carry on into the next section, but watch out for the soldier hiding in the room to your left. Sneak up and belt him with a critical hit, then creep through the doors in front of you. They lead to the location where you fought the First Warden, and once you've fought the two guards inside you'll be able to use the checkpoint.
When you're done, go back into the main hall and take the stairs on your left. There's a Captain waiting for you in here, but if you play it defensively and focus on using spells, you should have no trouble finishing the fight in short order. Once dead, you'll receive the Southern Trench Key, The Great Burden, and an audio clip.
Carry on into the next area and then go upstairs where a pair of enemies wait. Try to lure the less physically intimidating foe down the stairs first so you can fight him alone, then kill his friend. This latter enemy will drop the Planetarium Chest Key.
Take the audio clip in the next room along, then go up the stairs. Kill the guards to your right if you wish to, but you should be able to sneak past them and into the lift undetected if you prefer. Use the checkpoint first, then head towards the top of the Citadel to prepare for the final boss showdown with the Judge.
Not quite ready? Then back to the first page for the rest of our Lords of the Fallen guide and walkthrough.

