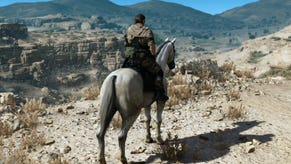
Metal Gear Solid 5 - The White Mamba: Masa Village and White Mamba boss fight
How to sneak inside Bwala ya Masa, find the White Mamba, then extract your target without causing any deaths in the next Phantom Pain mission.
Welcome to Metal Gear Solid 5 - The White Mamba, the 23rd main story mission of the game, following on from Retake the Platform.
The White Mamba Mission checklist:
- Extracted the White Mamba
- Extracted the prisoner being held at Masa Village
- Extracted the White Mamba without giving him the opportunity to resist
- Secured the rough diamonds hidden near Masa Village
- Extracted 20 child soldiers
Now that Mother Base is secure once more, it's time to buckle up and head back out into the field. Select 23-The White Mamba from your mission list, then choose the lone Landing Zone to the north-east of Bwala ya Masa. Once you're on the Sortie Prep screen, set D-Dog as your buddy and the Drop Time to 0600. With preparations complete, commence the mission!
Note that you'll need to use non-lethal force to complete your task so ensure you've packed plenty of suitable equipment. In particular, you should bring your standard WU S.PISTOL and the tranquilliser-based RENOV-ICKX TP sniper rifle. Furthermore, if you decide to bring Quiet along for the ride, it's vital that you research and equip the non-lethal Guilty Butterfly first.
The White Mamba: Approach Bwala ya Masa, then infiltrate the village
Your next task is to stop the militant forces ransacking Masa Village. To do this, you'll need to extract their commander - known as the White Mamba - out of their area. There is, however, one small catch: the militants are all children, and you'll automatically fail the mission if one is killed.
Once you've touched down in the mission zone, open your iDroid and locate your destination. As you'll see, it lies to the south-west, not too far from your starting position. There's also a main road running south-west toward it, but this is heavily occupied by hostiles.
As such, you'll need to stay well away from the road as you make your approach. The safest way to do this is to run directly south until your path is blocked by high rocks. Follow the rocks south-west and, eventually, you'll reach a small hill ahead. Work your way up the hill and locate the small outcrop to your right, overlooking the village. Activate your binoculars and search for hostiles.
When you're ready to continue, drop down off the outcrop and begin moving south-west. Pass between the watchtower and squat grey building ahead and deal with any soldiers that you encounter along the way. Remember, however: killing the child soldiers will result in mission failure, so you'll need to knock them unconscious with tranquilliser shots.
Once passed the building, you'll find yourself on a rocky ledge overlooking the central part of the village. Look south-west and, just over the rooftops, you'll see a grimy white boat, docked at the edge of the river. Intel suggests that the White Mamba is located here, so you'll need to wind your way through the buildings, heading toward the riverbank, until you reach the vessel.
Reach the boat and locate the White Mamba
From your lookout, head left and start travelling south-west. Cross the dirt track, slip between the concrete barriers and approach the high rock wall ahead. Next, hug the wall to your left and begin following it as it winds to the south, moving alongside the village. Stay low and use the tall grass as cover against prying enemy eyes.
As the rock wall bends to the south-west, follow it around and work your way down the steep incline. With the wall still to your left, locate the tiny hut near the stream on your right. Pause alongside the hut, open your iDroid and drop a waypoint marker on the White Mamba's vessel - which should be ever so slightly to the north-west of your current position.
Next, start moving toward the marker. Pass the small corrugated hut on your right, then slip between the two orange buildings ahead. Once you reach the dirt road, check that the cost is clear then quickly cross over to the other side. You'll spot a tall wooden windmill directly ahead - stay low and approach it cautiously, keeping watch for hostiles. Luckily, D-Dog's enemy-sniffing skills should prevent you from bumping into patrols unexpectedly.
Board the boat and confront the White Mamba
Once you reach the windmill, lie prone and crawl north-east toward the red shipping container lying next the boat. Move clockwise around the container and start journeying north-west again, keeping the ship on your right. Shortly, you'll see a large hole in the ship's hull and a ladder just beyond it. Use the ladder to reach the main deck, then climb the steps located slightly to the left ahead.
At the top of the steps, you'll come face-to-face with the infamous White Mamba. Once the cut-scene is over, you'll need to focus your efforts on bringing him down.
Fight and defeat the White Mamba
As your target is a child, you're once again limited to using non-lethal force. However, you're now authorised to use CQC. As soon as the action resumes, run over to your target (he'll likely still be standing by his chair) and punch him a few times in the face. He'll fall to the ground, then pick himself up and immediately run away.
From this point on, White Mamba will continue to move around the top three decks of the boat, picking up various objects to use as weapons. He'll then attempt to run in close and attack, most often from behind. As such, you'll need to roam the ship and hunt him down as he thunders about. An equally effective, but slightly less interesting tactic is to stay in the starting room and wait for your target to return - which he frequently will.
Whenever White Mamba moves in close and strikes, wait until the last possible moment then quickly counter the attack - if you're successful, you'll slam your target to the ground.
All in all, this is a relatively easy battle - although you should note that the White Mamba's attacks can do considerable damage you're caught unprepared. Additionally, you'll need to wary of the children lining the riverbank to the north-east and south-east.
Once the battle begins, they'll open fire whenever they see you out on deck - meaning that it's safest to stay on the south-west side of the boat. If their gunfire is causing you problems, you might want to thin their ranks using your non-lethal RENOV-ICKX TP sniper rifle that you packed earlier.
Need help with The Phantom Pain? Our Metal Gear Solid 5 guide and walkthrough explains how to complete every main story mission, and explains their many optional objectives. We also have lists of Blueprint locations, Tape locations, Key Item locations, how to unlock S Ranks and a Metal Gear Solid 5 Achievement and Trophy list.
Extract the White Mamba
When you've successfully managed to slam White Mamba to the ground a number of times, he'll (reluctantly) concede defeat. After the cutscene is over, you'll need to get him back to Mother Base. Luckily, the child soldiers outside have dispersed - so all that's left to do is carry your target over to the Landing Zone and leave the area.
Before you do, however, there's one last optional task - which is considerably easier now that the village is clear of hostiles. First, open your iDroid and identify the helicopter's rendezvous point.
Next, locate the building directly to the north of the landing zone. Count one building up from here (again to the north), then one to the east. You'll find a kidnapped Elite Soldier (who's well worth rescuing) at this last location.
Make your way over then drop White Mamba to the ground. Nip inside the building, grab the prisoner then carry her out into the open. Next, Fulton the prisoner to safety, hoist your target onto your shoulders and return to the chopper. Once White Mamba is onboard, the mission is complete. As a reward, you'll earn the White Mamba [2] cassette tape and the Mamba emblem part.
After the debrief is over, you'll automatically return to Mother Base. Sit back and enjoy the cutscene then summon a chopper and leave the area.
- The next part of our walkthrough explains how to complete Close Contact.
- Stuck somewhere else? Head back to the first page for the rest of our Metal Gear Solid 5 walkthrough.


