Pokémon Go Niantic Wayfarer beta release, account access, and how Niantic Wayfarer reviewing works
Everything you need to know about adding new points of interest in Niantic's games.
Niantic Wayfarer is a new tool developed by Niantic, which will allow you to nominate and review PokéStops in Pokémon Go, and points of interest in other games such as Ingress Prime.
Previously, if you wanted to nominate a PokéStop, you either had to be a Level 10 Ingress player or meet the criteria, and be in an eligible country, for the PokéStop nomination beta.
Niantic Wayfarer will be especially useful for all the Pokémon trainers who live in rural areas, which lack a good number of gyms and Pokéstops.
On this page:
Niantic Wayfarer beta access requirements explained
Niantic Wayfarer was released worldwide on November 13th 2019.

To be eligible for Niantic Wayfarer you must be Level 40 in Pokémon Go. If you're not, then its time to use all your spare Lucky Eggs to rake in some double XP.
To access Niantic Wayfarer in-game open the main Pokémon Go menu and then select 'Settings' from the upper right-hand corner.
Scroll down and you'll find a section entitled, 'Player Nominations.' Here you'll be able to nominate new PokéStops if you're Level 40 and, if your not, you get a little message informing you of this fact.
There is also a link to the guidelines for what makes a good PokéStops if you need a reminder.
How do you review a PokéStop nomination using Niantic Wayfarer?
Once you've nominated a couple of PokéStops - our guide on PokéStop nominations can help - you can continue to help the Pokémon Go community by reviewing PokéStop nominations.
There are nine steps that you need to complete when you're reviewing PokéStop nominations.
For nearly every step, you'll be asked to give a rating using a scale of 1 to 5 stars. The highest rating you can give is 5 stars, with 1 being the lowest.
The steps that don't use this scale are: 'Supporting Information,' 'Check Duplicates,' 'What is it?' and 'Additional Comments.'
1) Review the quality of the nomination
This step will ask you to give a rating of your overall first impression of the PokéStop. If you need help, then check out the criteria for what makes a good PokéStop nomination.
2) Title and Description
Make sure that the description and title for the PokéStop have been correctly spelled and are appropriate for all audiences.
3) Supporting Information
In this section the nominator may have provided some additional information about why they think they're nomination will make a great PokéStop.
You don't need to rate this section, but it's worth considering what the nominiator has to say about the location, especially if you can't visit it in person.
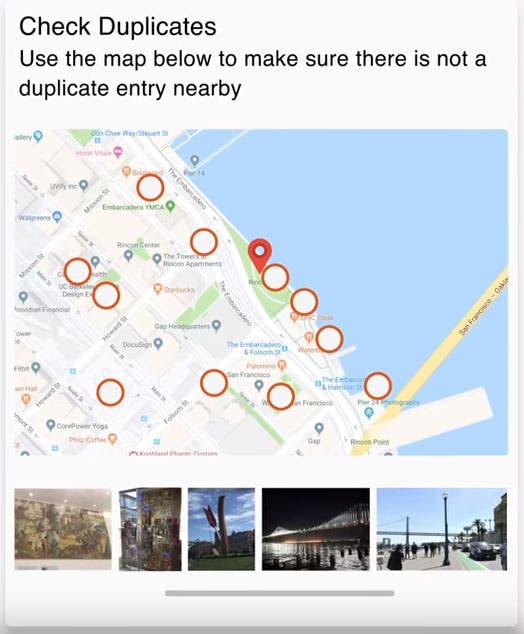
4) Check Duplicates
During this step, you'll find yourself looking at a small map of the local area surrounding the PokéStop nomination.
This map will contain all the currently available PokéStops for this area, allowing you to ensure that the nomination hasn't already become a PokéStop.


5) Historic or Cultural Significance
For this section you need to consider whether this nomination has any major significance to the local area or history as a whole.
Does the nomination celebrate a famous historic event or did one take place here? Does the proposed PokéStop have any cultural significance to the local town? Is it a piece of art or popular local hotspot?
6) Visually Unique
PokéStops need to be easy to find and, for this reason, they need to visually stand out from the rest of the world.
You'll be shown the picture of the nominated PokéStop again and, this time, consider whether you'd be able to find this PokéStop in the real world.
7) Safe Access
Nobody wants to die when playing Pokémon Go, so you need to make sure that each PokéStop nomination can be safely accessed.
Is there a road crossing nearby? Is the PokéStop in the middle of park?
You must also make sure that players can access the property without crossing into private property. This means you can't turn yours or your neighbours front porch into a PokéStop.
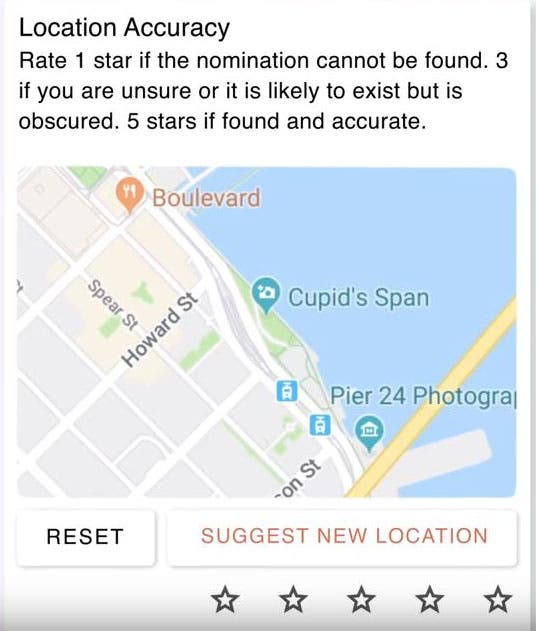
8) Location Accuracy

Location accuracy is, as the same suggests, ensuring that the pin on for the PokéStop is where the PokéStop actually is in real life.
During this stage you'll find yourself looking at a Google Map page with a pin for the PokéStop on it. You'll be able to move this pin to where exactly you believe the PokéStop should be.
You can also use Google Streetview if it's available for this area or you can use other methods, such as visiting the PokéStop in person, to ensure that the pin is where it's meant to be.
Finally, you will also have to rate the location of the pin out of 5 stars. 5 means that the location of the pin is perfect, 3 means that the pin is near the proposed location and 1 means that the PokéStop pin is in completely the wrong place.
The Dual Destiny Season is here! It brings the Holiday Part 1 event with it. You can now catch Dynamax Pokémon through Max Battles. First, however, you need to visit Power Spots to collect Max Particles and complete the To the Max! quest. Don't forget to try out Routes, Gift Exchange and Party Play while you're hunting down rare Pokémon, fighting in the Go Battle League or competing in PokéStop Showcases.
9) What is it?
In this step you need to pick a category or subcategory to describe what the object, building or area that has been nominated actually is.
Pick the closest descriptor from a drop down list, which includes 'Building,' 'Object,' and many others.
10) Additional Comments
Finally, you've reached the last stage. Here you can add any extra little comments that you personally want to add about the PokéStop.
This can be a small note about why this area really needs a PokéStop or why this is a dangerous location to place a PokéStop. You can also, if you choose, leave this space blank.


