Zelda Echoes of Wisdom Faron Temple walkthrough
How to complete the Faron Temple, including all puzzle solutions and chest locations.


Faron Temple in Zelda: Echoes of Wisdom is part of the Stilled Faron Wetlands rift. You'll need to visit it and complete it as part of the A Rift in Faron Wetlands main story quest.
There are a lot of dark and unlit areas waiting for you in this Zelda: Echoes of Wisdom temple, so make sure you've got Echoes that can light up the space around you like Ignizol. Also, there are enemies everywhere so we recommend making some smoothie recipes before you enter.
When you're ready, here's our Faron Temple walkthrough in Zelda: Echoes of Wisdom, including how to beat the Faron Temple mini-boss.
On this page:
If you're looking for more help, check out our Zelda Echoes of Wisdom walkthrough hub.
How to get inside Faron Temple in Zelda Echoes of Wisdom
To find a way inside Faron Temple you need to, of course, solve a puzzle. Head to the upper right-hand portion of the rift you'll find a door covered in flames and six flame-lit torches arranged outside of this. You need to extinguish all of the torches here, but they'll reignite themselves after a few seconds.

We used a Wind Cannon Echo, held it above our heads and span around in the middle of the torches to blow them out all at once.

When all torches are out, the flames covering the door will disappear and you can head inside.
In here head to the right and up the climbable wall, but be mindful of the enemy floating around so you may want to send up an Echo like Peahat to deal with them on your behalf. Then at the top of this wall hop off to the platform on the left and then climb up the next wall on the far side of this platform.

Keep climbing up the wall you're on until you reach the top of it, then hop off onto the small platform on the right. Then, from this platform, hop over to the next climbable wall and scale this until you reach the top. Again, be mindful of the enemy crawling around here.

At the top of the wall hop off onto the platform on the left and up the ladder here. This will bring you out into a room that has two Buzz Blobs in it. Defeat them using Echoes or Swordfighter Form and collect their Echo if you don't already have it, it will be easier to do your next task with them gone.
When you've dealt with the Buzz Blobs, light up the crystal in the middle of the room using their Echo.

Then head to the upper left-hand corner of the room. Here, you should find a crystal sitting on a platform - use Echoes to raise yourself to its level and light this one too.

Finally, in the upper right-hand corner of the room is a crystal stuck behind a metal wall. To activate this one, climb the 'L' shaped platforms just in front of it and launch the Echo at it.

When all crystals are lit the door to the next room will open. Head through here and into the next area. This will bring you outside the Faron Temple.
Zelda Echoes of Wisdom Faron Temple walkthrough
From the outside of Faron Temple, follow the path around to the left, you'll encounter a Mothula Lv.2 here so defeat this and collect its Echo, then continue to follow the path around to the north until you reach a ladder leading down a hole on the side of the temple itself.

Climb down this ladder and you'll be in your first part of Faron Temple. At the bottom of this ladder, hop off onto the platform to the right. Jump down the platforms here until you read a point where you're facing a Deku Baba on the platform opposite.
If you look above you, you should see a gap in the platforms here. You need to make your way up through this gap - to do this we used Bed Echoes to create steps and then used a Strandtula Echo to climb up the rest of the way.

Once you can't climb any further, get off on the platform to the right and then look up again. You should see that there's a large enemy guarding the chest here - we used the Mothula Lv.2 Echo we found outside and it defeated them very quickly.

When that pesky plant is out of the way, climb up to the platform the chest is on and open it to collect 10 Warm Peppers.
Now, head back down to where you entered this area from and look across from you to where the Deku Baba is sitting on a short platform (or was sitting on it, depending on if you've already plucked them).
From here make your way across to the platform just below this one, we used a Ghirro Echo for this. Now defeat the Strandtula that's hanging out here and then use your own Strandtula Echo to climb up to the platform that's on your right.

Again, use a Strandtula Echo (or whatever one you'd like) to climb up through the gap in the platforms above you. On the platform you come to, head through the gap on your right.
In this new area follow the path across to the right until you're standing on the solid platform that's to the right of the red platform you've just ran over. From here, you need to use an Echo to weigh down the platform on your left. We simply used three Boulder Echoes for this as you need to push it down all the way to ground level.

As this platform goes down, the one to your right will raise to the ceiling which gives you enough space to use a Strandtula Echo to create a path for you to climb up to the platform and ladder here.

This ladder will bring you out to an area that's split in half by a large metal gate. Head just north of the point you entered the room via the ladder and you'll find a switch on the floor. Stand on this switch to activate it and the metal gate will lower.

Once the gate is down, follow the path south and activate the Waypoint here before moving on. Now, head back to the point you exited the ladder and head up the stairs here. At the top of the stairs you'll find a locked door in front of you and to the right, so from here head up the set of steps to your left and the open door here.

This will bring you out into a small room with multiple webs covering the path forwards, we used an Ignizol Echo to burn these away and to attack the enemies in the northern part of the room.
Make your way to the lower left-hand corner of the room and use the door here to head outside. This will bring you out onto the roof of the temple itself.

Out here, head across the roof to the right until you find four statues lined up here. If you look carefully the second one in from the left is covering a door, use 'Bind' to pull this statue away and head through the door it reveals.

In this room there are three crystals you need to light up to reveal the chest hidden within. The first two crystals are right next to each other on columns in the water directly in front of the door. We lit these by sending Buzz Blob Echoes over to them.

This then leaves the third crystal which is on the right side of the room. It's in the upper right-hand corner of the space and you'll find that there's a Wooden Box between two tall walls here. Remove this box by pushing it into the void below.
Then, to light this crystal, we stacked Bed Echoes on top of each other to step out safely over the void and then launched a Buzz Blob Echo at it to light it. It's likely the other crystals have timed out at this point, if so then just relight them in the way you did earlier.

Once all three crystals are lit, the chest will be revealed and you can open it for a Small Key.
Zelda Echoes of Wisdom Faron Temple Dungeon Map location
Now head back outside onto the roof of the temple and down the path to the right. To the left of where you exit this path you should find some dense grass, if you look carefully there's actually a ladder here leading downwards. Climb down it.

At the bottom of the ladder jump into the water on the left and ride the current pulling you left. At the end of this stream dive downwards, passing through the bubbles here if you need to, and then follow the water along to the right until you reach a chest. Open this chest to get 50 Rupees.

From here swim back up to where the strong current ends and up to the surface here, then scale the ladder that's to the left of this.
This will bring you out into another room with thin platforms and a few moving platforms. There are yet more crystals in here that you need to light, so first of all head straight to the north on the platform you're currently on until you can't go any further.
Here you'll see multiple moving platforms to you right and, of course, the crystals you need to light. One platform will move directly to the one you're standing on and, when it does, hop onto it.
This platform will pull you to the left and very close to the crystal here. Once you're ready, light it (we used a Buzz Blob Echo for this).
Then, at the end of the platform you're on turn south and you should be able to hit the crystal here with another Echo too.

At this exact same point when you're as far as the platform you're on can take you, turn north and use the same Echo again to light the crystal here.
Once all three crystals are lit the door in the upper left-hand corner of the room will open. Make your way up here riding the longest moving platform that goes from south to north. At the northern end of this platform you should be able to hop off onto the one to the right of the crystal here and ride this up to the upper platform level.

When you're through this door you'll be in a room with a chest in it, open this chest to collect the Faron Temple Dungeon Map!

Zelda Echoes of Wisdom Faron Temple Big Key location
Now activate the button to the left of this chest and this will open the door on the left side of the room.

Head through this door and you'll be back in the room you started in (the one that was previously split by tall bars).
From here head down to the lower level of this room and through the door to the left of where the ladder exits the floor.

This will bring you out to a small room mostly filled with grass, there is a Mothula Lv.2 in here so you might want to use your Echoes or Swordfighter Form to defeat it before moving on.
In the upper left corner of the room it may just seem like tall grass, but this grass is hiding another doorway here. Slice this grass down to clear it and head through the door.

You'll now be in a very dark room. Head to the left and then when you hit the part of the floor that's made of water head to the south (we advise using Echoes to help light your way). You'll then find that part of the floor is made of spikes, so carefully walk around this as you move around them and continue heading south.

In this section we strongly recommend holding onto a bright Echo like Ignizol to help you avoid any surprises. Now, continue to the right here past the spiked floor and you'll find another dear leading out of the area.

Head out this door and you'll find yourself locked in the next room. To get out of here you need to weigh down the two grey pressure panel switches on the floor - we did this by placing two Armos Echoes on them (we did try using the statues in the room but this didn't register for us).

When the switches have been activated the doors will open, you then need to head through the one in the lower right-hand corner of the room.
This door will bring you out to a seemingly empty room with a Waypoint in it. Interact with this to activate it and then dive into the water here. Don't worry, there are no enemies here. While you're in the water, swim south and then dive, you'll find that there's an exit here that brings you back to the outer part of the temple - and this is where you need to be.

Exit the water to the right and look at the back wall here - it's covered in webs. Now, if you look at the web at ground level closest to the water you'll see that it's covering a doorway. Use an Echo to burn this web away and head inside (we used Ignizol.)

This brings you back inside another part of Faron Temple. In here you'll find two statues and two more pressure switches on the ground. You can smash the jars in here for some Refreshing Grapes.
As happened earlier, moving the statues over the switches didn't register for us but using two Armos Echoes did.

When the switches are activated the door to the next room will open, so head on through when you're ready. However, if you need to rest to stock up on Hearts we recommend doing so here as you'll have quite the fight in the next room.
In the next room you'll face a couple of enemies and we found the easiest way of clearing them out is to use a Fire Wizzrobe Echo. When the room has been cleared of enemies, head through the door that opens.

This will bring you out into a small corridor, follow the path forwards here and you'll come to a Waypoint.

Activate this and then use Echoes to light up the torches around the room and in the lower left-hand corner you'll find a ladder leading downwards between two torches. Go down this.

At the bottom of the ladder head left and dive down in the water here and keep diving down until you hit the floor in the lower right corner of the room. There's a Tangler here by some bubbles, deal with them and remember to swim through the bubbles to get some much needed air.
From the bubbles swim to the left and you'll find a Boulder blocking your path. Use 'Bind' to pull it out of your way then swim through the gap and into another Tangler, again deal with them (we used our own Tangler Echo here, fight fire with fire!). You'll then find that the path is blocked by another boulder, use 'Bind' to pull this out and swim through the gap it reveals.

More bubbles will be here so restock your air and then swim up until you come to the point where the current on your left will pull you to your left.

Ride the current here and in the lower left corner of the room will be more bubbles, again restock your air if you need to then start to swim up. You'll encounter more enemies on the way so use your Echoes to clear them out.

When you reach the surface of the water you should be able to see a chest on a platform on your right. Use an Echo to get up here (we used Strandtula) and open the chest to collect 50 Rupees.

From here swim back down and look to the right, you should be able to see an Armos statue. Use 'Bind' to pull this statue from where it's sitting and move it so it's in the current next to you.

Then, swim down and around to where the statue now is and swim up past it. Keep going until you reach the surface of the water, then get out of the water and climb up the ladder on the right.

This brings you out in another dark room and your exit is locked. Yes, you need to light yet more crystals (again). This time head to the right side of this room and use fire Echoes to light the torches around here to make it easier to find your way around.
The first crystal in this space is at the top of some stairs to the north of where you entered the room from the ladder.

The next crystal is in the lower right-hand corner of the room. Head down here to find the torch and then head left from the torch, you'll find the crystal wedged between two boulders here. Use 'Bind' to pull the boulders away from the crystal so you've got a clear shot at it.

The final crystal is to the left of the ladder that brought you into this room and against the wall here.

When all three crystals are lit, the door on the left and right sides of the room will open - head through the one on the left for now.
In the next room use Echoes to deal with the enemies here and head up the steps in the middle. Here, if you look to the left and right, you should be able to see more pressure switches against the rear wall.
First of all you need to put a Boulder Echo on the red platform to the left to weigh it down so that it's level with the switch here. Once that's level we placed Armos Echoes on each platform to move onto the pressure switches.

Once both switches have been activated the door on the left side of the room and the one to the north between the switches will open.
First of all head through the door on the left and this will bring you out to a chest, open this to collect another Small Key.
At the bottom of this room is a moveable wall, use 'Bind' to pull this open and head through the gap here. Again, you'll be in a dark room so use Echoes like Ignizol to light the torches in here to help you find your way.

From the point you enter the room head south and then past the glowing mushroom here to the left, you should find a Waypoint by a torch. Activate this.

Now from this point head to the right to the door we've marked on the map below, you should also be able to see it on your map too:
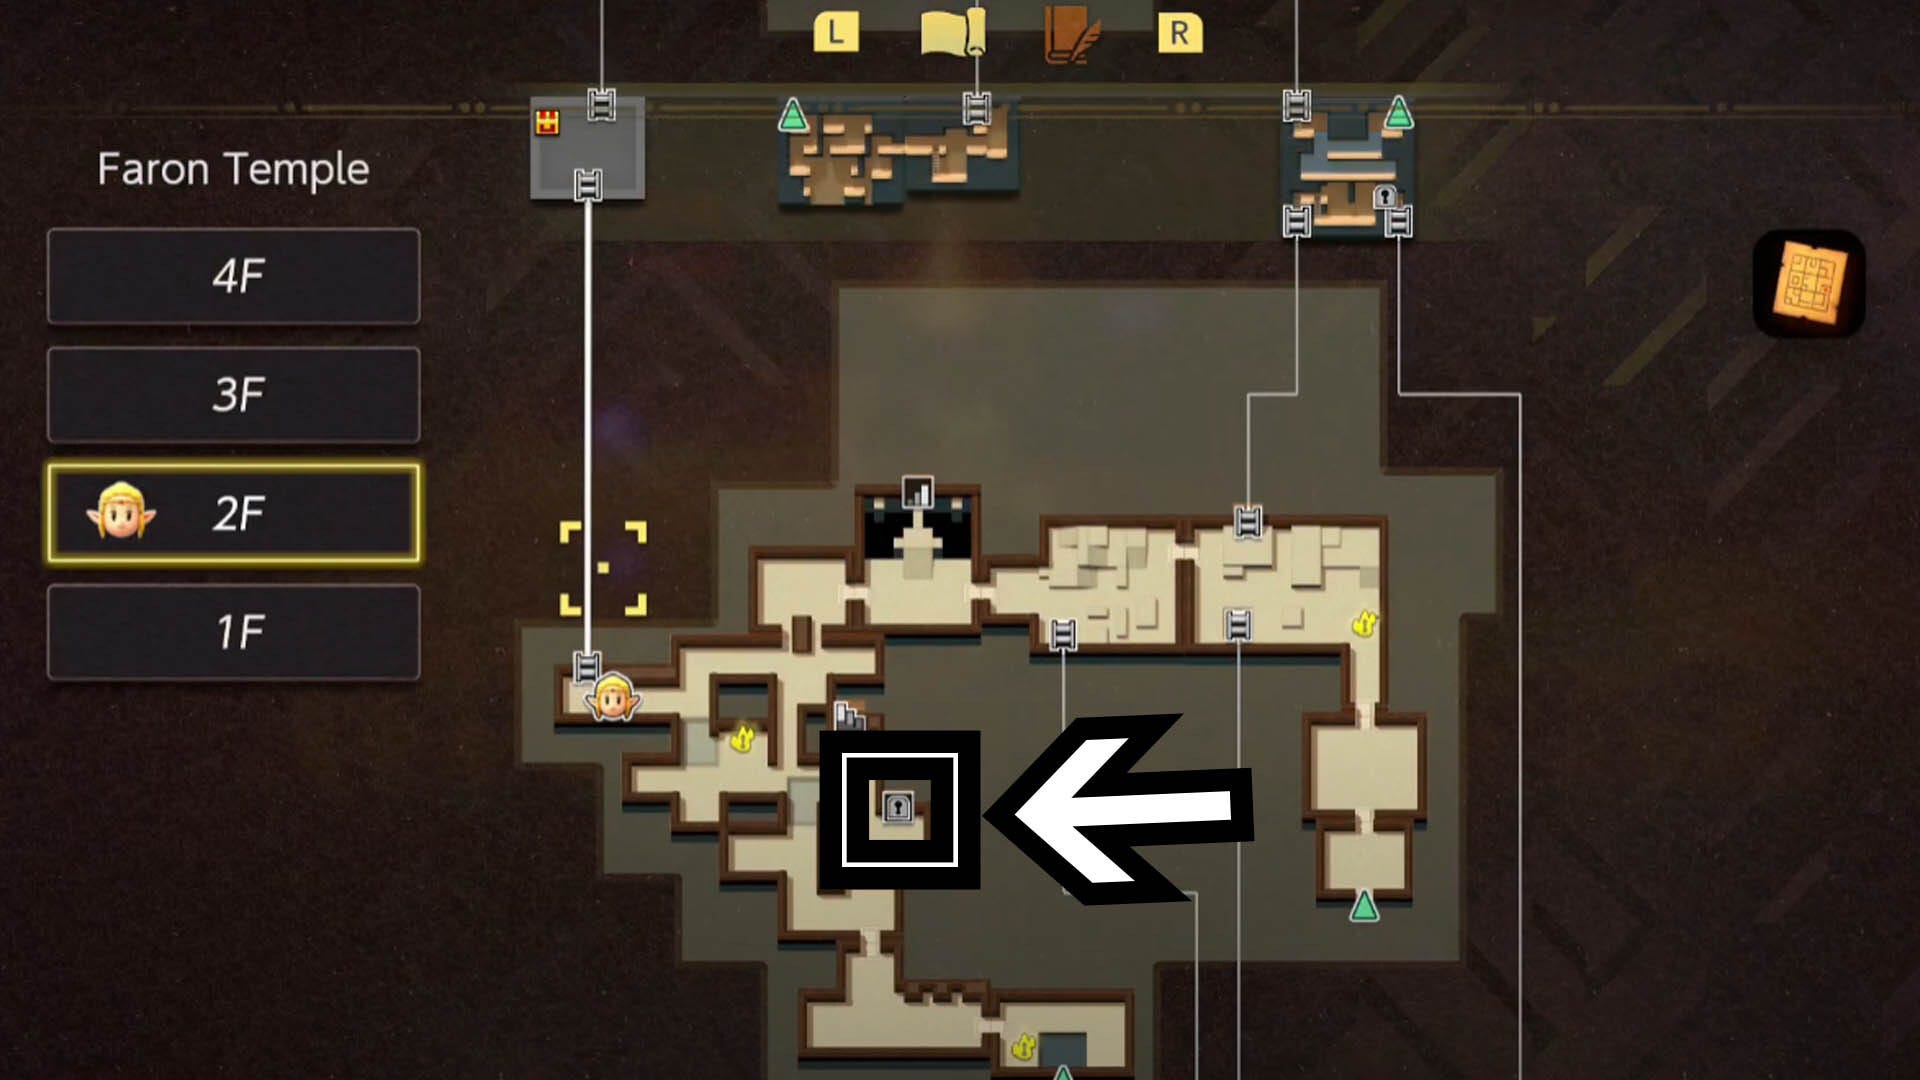
When you reach the locked door here interact with it to open it with one of the Small Keys you have in your inventory.

Head through the door and you'll find yourself in a room with another chest, open this one to collect a Golden Egg.

Now head back through the door back into the room you were just in and head to the upper left-hand corner of the room. This is up and to the left of the Waypoint in this room - you should find that there's a door here with a ladder in it. Enter the door and scale the ladder.

At the top of the ladder look to your right, you should see some bars here. Stand at the edge of the bars here and you should be able to see a red platform on the other side of the bars - place two Boulder Echoes on this to weigh it down.

Then head up the climbable wall on your left and then jump off onto the platform to the left at the top of the wall. Here, you should be able to see a blue device in the lower left corner of the area, just like the ones you've seen in Jabul Ruins Dungeon.

The platform above this device should now be raised to the ceiling so you can easily jump down and hit the device to turn it from blue to orange. Once it's orange the smaller gates blocking the rest of the path around the room will open.
From this device head up to the platform on the right, then across the climbable wall to the platform with the ladder on it. Climb up the ladder halfway and jump off onto the platform on the left with the chest on it. Open this chest to collect another Small Key - so now you should have two again.

Now, head back to the ladder and climb up it all the way to reach the next area. Here you'll be back in the room you were in near the very beginning of the temple with webs all over the floor - use Ignizol Echoes (or any ones you like) to burn the webbing away to clear a path for you.
Head across to the door on the right side of the room so you're back in the room you visited early in the temple - the one that was split in half by large bars.
Now that you're in here, head to the locked door at the top of the stairs and interact with it to use one of your Small Keys to open it. If you need to rest to stock up on Hearts we recommend doing it now before moving forwards. Once it's open and you're ready, head inside.

How to beat the Faron Temple Dungeon mini-boss in Zelda Echoes of Wisdom
In here you'll come face to face with that pesky plant that swallowed the chest just before you entered Faron Temple.
To attack it, send out a couple of strong Echoes to inflict attacks on it while you're also attacking the heads. When the heads are dazed, look for the red ball on its neck connecting it to the main plant base - enter Swordfighter form and attack this to remove the head from the plant.
You need to do this to both heads.

When both heads have been removed the plant will scurry off somewhere else, so you don't need to worry about it for now. Right now you need to go open up your map and look at the third floor map.
Here, you need to head for the locked door location we've marked on the map below:

To get here head to the Waypoint we've marked here, then in this room head north from the Waypoint until you reach the back wall. Then at the back wall follow the path to the left.

Here, you should find a door with a ladder in it. Go through the door and scale the ladder.

In the next room, head left and stand beneath the rock that's between the two platforms here.
Use Boulder Echoes to weigh down the platform on the left which will raise the one on the right to the ceiling. Once you've done this, head to the right and use an Echo to reach the lock here - interact with it to use one of your Small Keys.

Then, continue forwards and down the ladder here. This will bring you out to a small room with a Waypoint in it. Smash the jars in here if you want some Hearts and then activate this Waypoint and continue through the door near it.

When you enter this room the pesky plant is back again! Luckily you know how to deal with it, just this time it's got four heads now - two of them are purple and two are green but the premise is exactly the same as earlier.
Send out Echoes to distract the heads, pull at them with 'Bind' to daze them and attack the weak spot on their necks in Swordfighter Form.

Once you've beaten this plant it will open up and reveal a chest, open this chest to get the Big Key!


Now that you've got that, you need to find your way to the Big Door to use the Big Key. If you've not already found this room and activated the Waypoint in it, then you'll need to take a few steps back to places you've already been.

If you've activated the Waypoint in the room with the Big Door (as marked on the map above) then you can simply warp here to face the boss.
If you've not found this room yet then open up your dungeon map and warp to the Waypoint we've marked on the map below:

Once you're here, head to the right past the wall and north through the tall grass section here. Keep moving forwards until you find the wall that you use 'Bind' on earlier to move - walk through the gap here into the next room.
In this room continue through the door to the right and then go up the stairs in the middle of the room. Head through the door at the top of these stairs.

This will bring you out into the room with the Big Door in it! Activate the Waypoint to the left of the door and use this safe space to replenish some Hearts if you need to. Smash the jars in here to get some Refreshing Grapes and Floral Nectar. When you're ready, use the Big Key on the Big Door and head through.

In this room you'll face the Faron Temple boss - Gohma. We've got a separate guide showing you how to beat Gohma if you need a helping hand facing this six-legged boss.

Once you've beaten Gohma you will have completed the Faron Temple, well done!
That's all for now! If you're looking for more handy tips for your adventure, check out our Lanayru Temple and Eldin Temple walkthroughs. And if you're wondering whether you should complete the Eldin, Faron or Lanayru Temple first, then we've got a guide for that also.